Daylight Saving Time is over until next spring. For the majority of folks who are cycling commuters in the DC area, it’s dark by the time the office door closes at the end of the day.
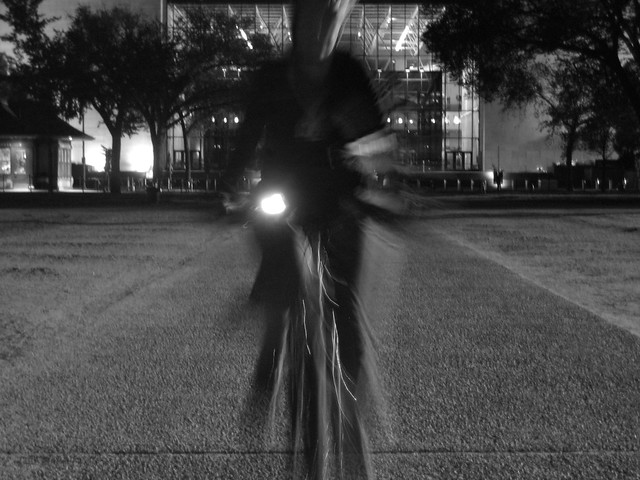
Every year, the same thing occurs: a lot of cyclists hit the roads without lights, wearing the standard-DC-issue black jacket, on a bike that very likely has no reflectors on it.
These cyclists are bike ninjas.
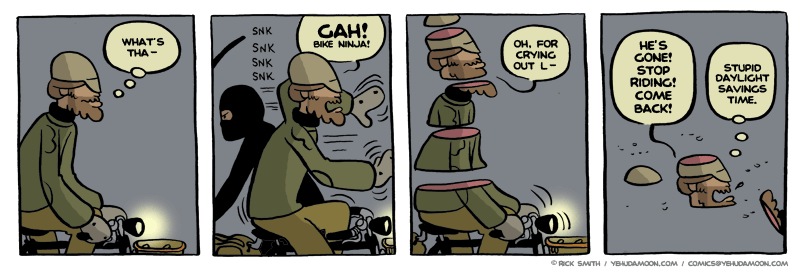
Most of these folks ride as if it were daylight, and assume they can be seen. That isn’t the case. Dressed in black, and even with a few reflectors, they aren’t visible until too close for comfort – or for safety.
Recently, near Dupont Circle, I counted over 50 commuter cyclists within a 15 minute period. Of these, only 25 had proper lighting in the front, as mandated by law. A few more than that had some sort of taillight. And most were dressed in dark, non-reflective, hard-to-see colors.
This is an easy problem to solve without spending a lot of money. Most people own some bright clothing, like a colorful shell or shirt. A basic reflective vest costs under $10. Reflective ankle straps that serve a dual purpose of keeping pants legs out of the bicycle drivetrain and create moving light points for drivers to see are cheap and come in myriad colors (including black, for those who want to keep their DC fashion cred).
And then there are lights. A basic set of front and rear blinking lights (i.e. “be seen” lights) runs around $15-20 dollars, weighs very little, and lets fellow road, trail, and sidewalk users know your presence as a cyclist. WABA and Bike Arlington even hand out free light sets that serve this basic purpose.
If you plan on riding on more poorly lit roads, trails, or paths, it’s worth investing in more heavy-duty “to see” lights – something I’ll discuss below. But a basic light set is simple, cheap, and effective, and takes care of the “bike ninja” issue.
If you plan on doing regular bike commuting during dark hours, the best thing to do is invest in lights that illuminate your path. Fortunately, LED technology has made wonderful, bright, low-energy-consumption, rechargeable lights quite affordable. For most riders’ needs, a 250-400 lumen headlight provides more than enough illumination of the road, and can run at full power for 2-3 hours per charge.
For those whose rides take them away form streetlights – onto multi-use paths, trails, or rural roads – something a bit brighter (500-1,100 lumens) is better. These brighter lights have larger capacity batteries, but still get 2-3 hours of burn time at the highest output setting (and markedly more at lower power settings – these lights tend to have multiple brightness modes, as well as multiple blink modes).
Most good lights will mount on handlebars easily, and can be quickly removed when you park your steed. Expect to pay anywhere from $45-90 for a name-brand LED headlight in the 400-1,100 lumen range (e.g. Cygolite, NiteRider, Light & Motion, Cateye), or less if you go with a generic brand of unknown quality (though many of these are quite good, and there’s less guilt if they break or are stolen).
If you need more light, helmet-mounted lights are a good solution. They run a bit more than handlebar mounted lights ($90 and up for a compact unit), but used in conjunction with a handlebar light, being able to illuminate where your bike points and where you are looking is a real boon. LED technology has made these lights great, with small battery packs that mount on the helmet and run for 4-6 hours per charge.
One thing to remember: these lights are bright, and if you ride a standard (i.e. non-recumbent) bicycle they will be at eye height for most car drivers and will also be bright in the eyes of fellow cyclists. While the former need to see people on bicycles via lights, the latter could use a little dimming so they aren’t temporarily blinded. This is especially the case on multi-use paths (in the DC area, trails like the Capital Crescent, W&OD, Martha Custis, Mount Vernon, or Anacostia River Trail). And easy way to temporarily dim a light (as long as you feel comfortable riding one-handed) is to use a hand to cup over the light’s upper beam. Note that some headlights, when mounted properly, won’t shine upward into the face of cyclists.
Also: when riding on a multi-use path or a two-way protected bike lane: never, ever have your headlight set to strobe! This is blinding and can cause crashes.
For taillights, it’s best to get one that has a bright, steady red beam, as well as a blink function for daytime or solo riding at night. Riding in a group, it’s courteous and safer to have the light in a steady beam state. Most taillights run on AAA batteries, or are rechargeable via a USB port (this is the preferred kind to get as you can recharge them via any computer), and will run for days – if not weeks – without needing a recharge, depending on how much the light is used.
Note: this “dressing brightly and carrying lights” argument can – and should – be transposed to folks who run at night, especially on multi-use paths (MUPs) like the W&OD, Martha Custis, Mount Vernon, and Capital Crescent Trails, where being tough to see can cause collisions between trail users.
This is an expanded re-post from randomduck.com and was last updated on November 3, 2019 – click here for the original version.